티스토리 뷰
Ruby on Rails : devise를 활용한 이메일 인증 [Gem : devise]
나른한 하루 2019. 11. 4. 18:18해당 글은 https://blog.naver.com/kbs4674/221068186479 로 부터 게시글이 이전되었습니다.
회원가입 시, 본인확인 및 어떤 특정한 소속의 확인을 위해 이메일 인증이 필요한 경우가 있습니다. 이번에는 이메일 인증이 있어야만 회원가입을 할 수 있는 방법에 대해 소개하고자 합니다.
시작 전 유의사항
1. Gem : devise를 이미 사용하고 있다는 가정하에 이 글을 작성합니다! [ devise Gem 설치법 클릭 ]
2. 현재 devise는 기본적으로 메일인증을 거치지 않고, 바로 회원가입이 됩니다.
-
devise : 이메일 인증 후 회원가입
1. db/migrate/[기간 및 버전]_create_users.rb 파일을 열람 후, 파일 내용을 보면
class DeviseCreateUsers < ActiveRecord::Migration[5.2]
  def change
    create_table :users do |t|
      ...
      ## Confirmable
      # t.string   :confirmation_token
      # t.datetime :confirmed_at
      # t.datetime :confirmation_sent_at
      # t.string   :unconfirmed_email # Only if using reconfirmable
      ## Lockable
      # t.integer  :failed_attempts, default: 0, null: false # Only if lock strategy is :failed_attempts
      # t.string   :unlock_token # Only if unlock strategy is :email or :both
      # t.datetime :locked_at
      t.timestamps null: false
    end
    add_index :users, :email,                unique: true
    add_index :users, :reset_password_token, unique: true
    # add_index :users, :confirmation_token,   unique: true
    # add_index :users, :unlock_token,         unique: true
  end
end
위와같이 주석처리(#) 된 내용을 볼 수 있는데, 주석처리를 삭제합니다.
# frozen_string_literal: true
class DeviseCreateUsers < ActiveRecord::Migration[5.2]
  def change
    create_table :users do |t|
      ...
      ## Confirmable
      t.string   :confirmation_token
      t.datetime :confirmed_at
      t.datetime :confirmation_sent_at
      t.string   :unconfirmed_email # Only if using reconfirmable
      ## Lockable
      t.integer  :failed_attempts, default: 0, null: false # Only if lock strategy is :failed_attempts
      t.string   :unlock_token # Only if unlock strategy is :email or :both
      t.datetime :locked_at
      t.timestamps null: false
    end
    add_index :users, :email,                unique: true
    add_index :users, :reset_password_token, unique: true
    add_index :users, :confirmation_token,   unique: true
    add_index :users, :unlock_token,         unique: true
  end
end
위 내용은 주석처리를 삭제한 코딩으로서, 위 코드처럼만 되어있으면 됩니다.
2. app/models/user.rb 파일 내용을 보면 devise의 여러 옵션이 있는데
:confirmable위 옵션을 추가해주세요.
class User < ApplicationRecord
  ...
  # :confirmable, :lockable, :timeoutable and :omniauthable
  devise :database_authenticatable, :registerable,
         :recoverable, :rememberable, :trackable, :validatable, :confirmable
  ...
end
3. config/application.rb 파일을 열람 후, 다음 내용을 추가합니다.
## devise : 이메일 인증 설정

  config.action_mailer.delivery_method = :smtp
  config.action_mailer.perform_deliveries = true
  config.action_mailer.default_url_options = { host: 'http://...' }
  ActionMailer::Base.smtp_settings = {
    :address              => 'smtp.gmail.com',
    :domain               => 'mail.google.com',
    :port                 => 587,
    :user_name            => ENV["GOOGLE_EMAIL_ID"],
    :password             => ENV["GOOGLE_EMAIL_PASSWORD"],
    :authentication       => 'login',
    :enable_starttls_auto => true
  }
코드에 보면 ENV 코드가 보이는데 해당 코드는 내부 정보를 은닉하고자 환경변수를 사용했습니다.
4. 환경변수 사용을 위해 Gemfile 에서 설치할 Gem을 작성합니다.
## Gemfile

gem 'figaro'
그리고 터미널에 아래 명령어를 입력해서 Gem을 설치합니다.
bundle install
5. config 폴더에 application.yml 파일을 새로 생성합니다.
6. config/application.yml 파일에 다음 내용을 작성합니다.
## config/application.yml

GOOGLE_EMAIL_ID: ""
GOOGLE_EMAIL_PASSWORD: ""
아래 코드 예시는 제 기준으로 작성된 예시입니다.
이메일 계정 정보는 여러분들에게 맞게 입력해주세요.
## config/application.yml

GOOGLE_EMAIL_ID: "kbs4674@likelion.org"
GOOGLE_EMAIL_PASSWORD: "a123456"
7. 예상치 않은 에러 발생을 대비해서 아래 내용과 같이 true 상태로 바꿔주세요.
* 코드 위치 : config/environments/development.rb 및 config/environments/production.rb
config.action_mailer.raise_delivery_errors = true
8. 서버를 껏다 킵니다.
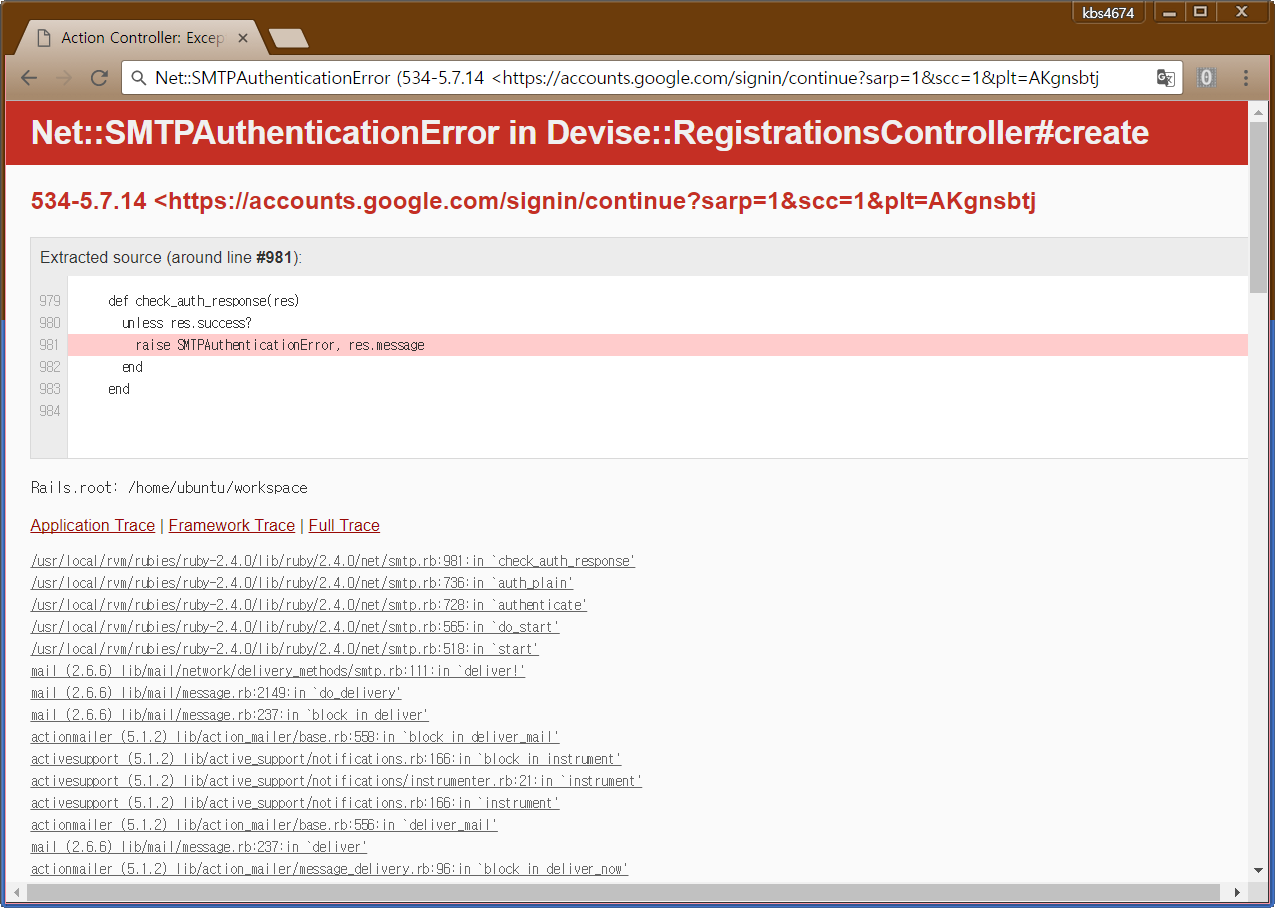
9. 제가 8번 과정까지 진행을 하고, 이메일 테스트를 하려 했더니

위 에러메세지를 겪게 되었습니다. 저 에러를 해결하느라 애를 좀 먹었었는데..
알고보니 저 현상의 원인을 해결하기 위해선 구글 계정 Access 허용 및 보안수준 앱 접근에 대해 허용을 해줬어야 했습니다.
- 구글 Access 허용 : https://myaccount.google.com/u/0/lesssecureapps?pageId=none
- 보안수준앱 접근 허용 : https://accounts.google.com/DisplayUnlockCaptcha
위 두 설정 사이트 접속 후, 구글 계정 Access 허용 및 보안 수준 앱 접근 허용을 해주세요.
그리고 약 10분정도 기다려준 뒤에, 다음 과정을 진행합니다.
10. 9번과정까지 거치고, 회원가입을 하면
인증메일이 와있습니다!

참고 메일 내용은 app/views/devise/mailer 에서 수정 가능합니다.
- devise : 특정 이메일 주소만 가입 허용시키기
만약 내 사이트에 @naver.com 주소를 쓰는 사람만 가입 신청을 받게 하고 싶다면 다음 과정을 따라해보세요!
1. config/initializers/devise.rb 파일로 가시고, 다음 내용을 찾아내서 수정합니다.
config.email_regexp = /\A[^@\s]+@[^@\s]+\z/위 내용을
'네이버 도메인(@naver.com)'만 가입 승락을 원할 시 아래 코드처럼 바꿔줍니다.
config.email_regexp = /\A([\w\.%\+\-]+)@naver\.com\z/i만약 2개 이상의 이메일 도메인을 적용하고 싶을 경우, 아래 내용으로 작성해주세요.
config.email_regexp = /\A([\w\.%\+\-]+)(@hanmail\.net\z)|(@naver\.com\z)/i
2. 서버를 껏다 킨 후, 변경사항을 적용합니다.
참고 config 폴더 안에 있는 파일이 수정될 경우 서버를 껏다 켜야 합니다.
- 자료 참고
1. devise에서 gmail을 활용한 확인인증 메일 보내는법 [클릭]
2. Stackoverflow - SMTP설정 에러 [클릭]
3. HTML5 - Pattern (정규식 표현) [클릭]
루비온 레일즈 Ruby on Rails ROR
'프로그래밍 공부 > Ruby on Rails : Gem' 카테고리의 다른 글
| Ruby on Rails : 페이스북 연동 로그인 API [Gem : omniauth-facebook] (0) | 2019.11.04 |
|---|---|
| Ruby on Rails : 네이버 연동 로그인 API [Gem : omniauth-naver] (2) | 2019.11.04 |
| Ruby on Rails : Devise에 닉네임, 오늘의 한마디 기능 넣기 (0) | 2019.11.04 |
| Ruby on Rails : Devise 문제 이슈 및 해결방안 (게시글을 쓰고 회원탈퇴를 한다면..?) (2) | 2019.11.04 |
| Ruby on Rails : devise 한글번역 + 'Time-Ago 번역' [Gem : devise-i18n] (0) | 2019.11.03 |

